
This post explores the Puppet topics of Classes, Roles and Profiles as well as how to utilise Puppet Template files. The class keyword is a key Puppet building block. There are various different ways to utilise the class keyword and these are explored below.
This is a continuation of a series of posts on Puppet, with a focus on its use with Windows. If you are new Puppet, I suggest reviewing the following posts first:
- Getting started with Puppet on Windows
- Puppet variables, expressions, facts and hiera
- Using Puppet modules, forge and r10k
Classes
“Classes are named blocks of Puppet code that are stored in modules for later use and are not applied until they are invoked by name. Classes generally configure large or medium-sized chunks of functionality, such as all of the packages, config files, and services needed to run an application.” - Classes
When you use the class keyword you’re informing Puppet that a specified collection of resources should be grouped together and given a name, but that these resources shouldn’t be applied (yet). You can then use the include keyword in a manifest to declare the class and have the resources executed. In my Puppet Modules post, we create a windows_ntp class, which grouped together a registry resource and a service resource to configure the Windows Time service:
class windows_ntp {
  registry::value { 'NtpServer':
    key  => 'HKEY_LOCAL_MACHINE\SYSTEM\CurrentControlSet\Services\W32Time\Parameters',
    data => 'time.windows.com,0x9',
  }
  service { 'w32time':
    ensure => running,
    enable => true,
  }
}
We could then execute this class from a manifest by declaring include windows_ntp.
Class Parameters
While the above is already useful, we can make this class more powerful by including parameters, which allow us to pass input data to change how it’s applied. For example, we could change our windows_ntp class to accept the time server address as a parameter named $server:
class windows_ntp (
  String $server = 'time.windows.com',
) {
  registry::value { 'NtpServer':
    key  => 'HKEY_LOCAL_MACHINE\SYSTEM\CurrentControlSet\Services\W32Time\Parameters',
    data => "${server},0x9",
  }
  service { 'w32time':
    ensure => running,
    enable => true,
  }
}
We declare this class via include windows_ntp Puppet will automatically check the Hiera data for any matching settings for the class. For example we could have the following line in Hiera:
windows_ntp::server: '0.europe.pool.ntp.org'
And this setting would override the default. If no setting was found, the time.windows.com default would apply.
You can probably already see how this is pretty powerful behaviour. We can have a standard class with sensible defaults, but create (for example) regional settings via Hiera that would be applied to different sets of servers as required.
Parameter Types
In the above example we added a single string type parameter to our class. We could of course have multiple parameters and there are various different parameter data types available for use:
String- You can also specify one or two additional parameters to specify the minimum and maximum length of the string, e.gString[1,5].Boolean-trueorfalse.Integer- Any whole number.Float- Any floating-point number with optional decimal fractions.Numeric- Any integer or float.Array- An array of values. You can also specify the type of value accepted, e.gArray[Integer]would only accept an array of integers.Hash- A hash of values. Again, you can specify the accepted types, e.gHash[String, Integer]would only accept a hashtable with string keys and integer values.Regexp- Any or a specified regular expression. Beware confusing this with thePatternabstract type.Undef- Any variable or parameter that hasn’t been assigned a value.Type- One or more literal Puppet data types, per these lists.
There are also abstract data types. Abstract data types let you do more sophisticated or permissive type checking:
Optional- Wraps one other data type, and results in a data type that matches anything that type would match plus undef. E.gOptional[String].Pattern- Matches strings against one or more regular expressions.Enum- A specific list of valid values, e.gEnum['red','yellow','green'].Scalar- Matches any valid values that areinteger,float,string,booleanorregexp. Does not matchundef,arrayorhash.Data- Matches any value that would matchscalaras well asundef,arrayorhash.Collection- Any array or hash, regardless of values/keys they contain.Variant- Matches a collection of other data types. E.gVariant[Enum['true', 'false'], Boolean].Any- Matches any data type.
It’s generally best practice to use the most specific data type possible as a form of input validation.
Defined Resource Types
So far we have created classes to group together related resources. These are singleton in nature, which means that they can be declared only once.
“Classes are singletons — although a given class can have very different behavior depending on how its parameters are set, the resources in it will only be evaluated once per compilation.” - Classes
This might make sense for some classes you create, for example we likely only want to configure the Windows Time settings once on a server. However sometimes you want to be able to declare multiple instances of a class, in the same way as you can declare multiple instances of a specified Puppet resource (with unique titles). To permit this for our classes, we need to create a defined resource type.
Defined resource types are very similar to classes, but we instead use the define keyword. Here is an example that could setup a user and a home directory on one of three file servers:
define user_with_homedirectory (
  Enum[
    'Server1',
    'Server2',
    'Server3',
  ] $Server,
) {
  user { $title:
    ensure => present,
  }
  file { "//${Server}/${title}/":
    ensure => directory,
    owner => $title
  }
}
We could then declare a user in a manifest as follows:
user_with_homedirectory { 'mark':
  server => Server2,
}
Note that in the above example we’ve used the automatic
$titleparameter that is always available in classes and defined resource types to use as the username value. This follows the general pattern you see in other resources.
You can nest defined resource types inside your singleton classes. By doing so you could enable a piece of software to provide the ability for users to configure multiple instances of a sub-component, e.g a database_server class could expose a some_database resource definition.
Type Aliases
If you need to reuse a specific type definition across multiple classes, or want to give a type a descriptive name, you can use the Type keyword to create a new type alias. For example:
type FileServers = Enum['Server1','Server2','Server3']

define user_with_homedirectory (
  FileServers $Server,
) {
  ..
}
This is particularly helpful when you have a type that matches a complex pattern (for example an IP Address) which you might need to reuse.
When creating types for modules, you should store them in a file named after the type in the /types subdirectory of the module. E.g our example above would be stored in /types/fileservers.pp.
Roles and Profiles
There are no specific keywords for defining roles and profiles in Puppet. Rather the concept involves using the class keyword to create specific configurations of modules (as profiles) and to then group these profiles for a specific machine purpose (as roles). Together these define how specific servers should be configured.
Note, you don’t have to utilise the roles and profiles approach at all if you don’t want to, but doing so can help to make your manifests more maintainable over time.
“Your typical goal with Puppet is to build complete system configurations, which manage all of the software, services, and configuration that you care about on a given system. The roles and profiles method can help keep complexity under control and make your code more reusable, reconfigurable, and refactorable.” - Designing system configs: roles and profiles
Using Roles and Profiles separates your code into three levels:
- Component modules – normal modules managing a particular technology (e.g MSSQL).
- Profiles – Wrapper classes that combine multiple modules to configure a layered technology stack (e.g a web server).
- Roles – Wrapper classes that combine multiple profiles to configure a complete system (for example our “web server” role might also be combined with a “security” role that hardens the server and a “monitoring” role that configures monitoring).
Profiles
“From a Puppet perspective, a profile is just a normal class stored in the profile module.”
A profile will generally be a class that takes a particular module and adds additional code or logic to implement the it appropriately in your environment.
Here is an example (from the official Puppet documentation) of a Jenkins Master profile:
class profile::jenkins::master (
  String $jenkins_port = '9091',
  String $java_dist    = 'jdk',
  String $java_version = 'latest',
) {

  class { 'jenkins':
    configure_firewall => true,
    install_java       => false,
    port               => $jenkins_port,
    config_hash        => {
      'HTTP_PORT'    => { 'value' => $jenkins_port },
      'JENKINS_PORT' => { 'value' => $jenkins_port },
    },
  }

  class { 'java':
    distribution => $java_dist,
    version      => $java_version,
    before       => Class['jenkins'],
  }
}
Roles
“To write roles, we consider the machines we’ll be managing and decide what else they need..”
A role class will generally only include profiles and is used to identify a particular function for a node. Continuing the example above, our Jenkins Master role might be a combination of the profile shown above as well as our (currently imaginary) security hardening and server monitoring profiles that were mentioned earlier.
class role::jenkins::master {
  include profile::security
  include profile::monitoring
  include profile::jenkins::master
}
Templates
Templates are used to interpolate values of Puppet variables, facts or Hiera data in to files (generally configuration files).
While you can simply use the Puppet file resource to set the complete contents of a file via the content => attribute or from another source file via the source => attribute these only allow you to set a file based on a static source. Often you need the contents of a file to vary depending on where it is used. You could maintain multiple static source files, but Templates offer a more flexible alternative.
A template is simply a standard text file with special placeholders markers (<%= .. %>) to identify where Puppet should inject values. For example:
some_config_setting = <%= $some_config_value %>
You still make use of template via the Puppet file resource and the content => attribute. To do so, you make use of the epp() function:
file { 'c:/windows/system32/drivers/etc/hosts':
  content => epp('/source/hosts.epp'),
}
The above example simply interpolated a variable value into a template. The template tags can also contain any valid Puppet expression or code. This might make sense for example if we needed to set a configuration setting based on a variation of the machine the Puppet manifest is applied to (such as the amount of memory). For example if we needed some app memory setting to be set to 75% of total RAM:
some_memory_setting = <%= $facts['memory']['system']['total_bytes'] * 3/4 %>
We can also use Puppet’s conditional statements to make certain parts of a template optional:
<% if $facts['os']['family'] == 'Windows' { -%>
..some Windows specific config..
<% } -%>
And iteration to generate a varying number of elements based on some collection:
<% $facts['networking']['interfaces'].each |String $interface, Hash $attrs| { -%>
  some_interface_setting = <%= $interface %>
<% } -%>
Template Parameters
Because you can include various variables and Puppet code per the above examples, it can easily become difficult to know which of these a specific template contains. One way to manage this is to add parameter declarations at the top of your template. This is optional and is done using | pipe characters as follows:
<% | String $some_config_setting,
     String $some_other_setting,
| -%>
Just like Classes, parameters can be given default values and any that do not have default values are mandatory. When you include parameter declarations you must then pass any mandatory parameters in hash form as the second argument of the epp() function:
file { 'c:/windows/system32/drivers/etc/hosts':
  content => epp('/source/hosts.epp',
    {
       'some_config_setting' => 'something',
       'some_other_setting'  => 'something else',
    },
  ),
}
The values passed need not be literal, you could (for example) use lookup() to get Hiera values. In facts its generally best practice to do your Hiera lookups this way vs doing so in the templates directly.
Debugging Templates
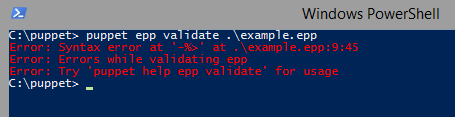
Puppet provides a tool to assist with validating templates:
puppet epp validate .\path\to\template.epp
If there is no output the template is valid. If there is any error in the template, you’ll see an error message accordingly:
Puppet also provides a tool to generate what the template will look like so you can validate the result is what you expect:
puppet epp render
To use this you must pass it a string that is a hashtable of values for the input variables. For example:
puppet epp render .\example.epp --values { some_config_setting => 'something', 'some_other_setting' => 'something else' }
Returns:
 – This .epp contains all the examples above so the other output values have been generated from the
 $facts variable.
Summary
This post has been an exploration of the ways in which to wrap your Puppet code as classes, profiles and roles in order to make it more reusable and how you can use templates to handle configuration files in a more dynamic way. To read more on these topics I recommend the following links:


Comments