
This blog post explores the topic of Puppet Modules for packaging and sharing code. It also looks at how you can use Puppet’s public module repository Forge to find existing modules and how you can use the r10k module management tool to update, manage and maintain them on your machines.
This is a continuation of a series of blog posts on Puppet inspired by the Puppet 5 Beginner’s Guide by John Arundel. If you are new to Puppet you might be interested in the previous two posts:
What are Modules?
Put simply a module is a way to package a portion of Puppet code to make it shareable and reusable as well as (ultimately) more maintainable.
“Modules are self-contained bundles of code and data. These reusable, shareable units of Puppet code are a basic building block for Puppet.”
Puppet Forge
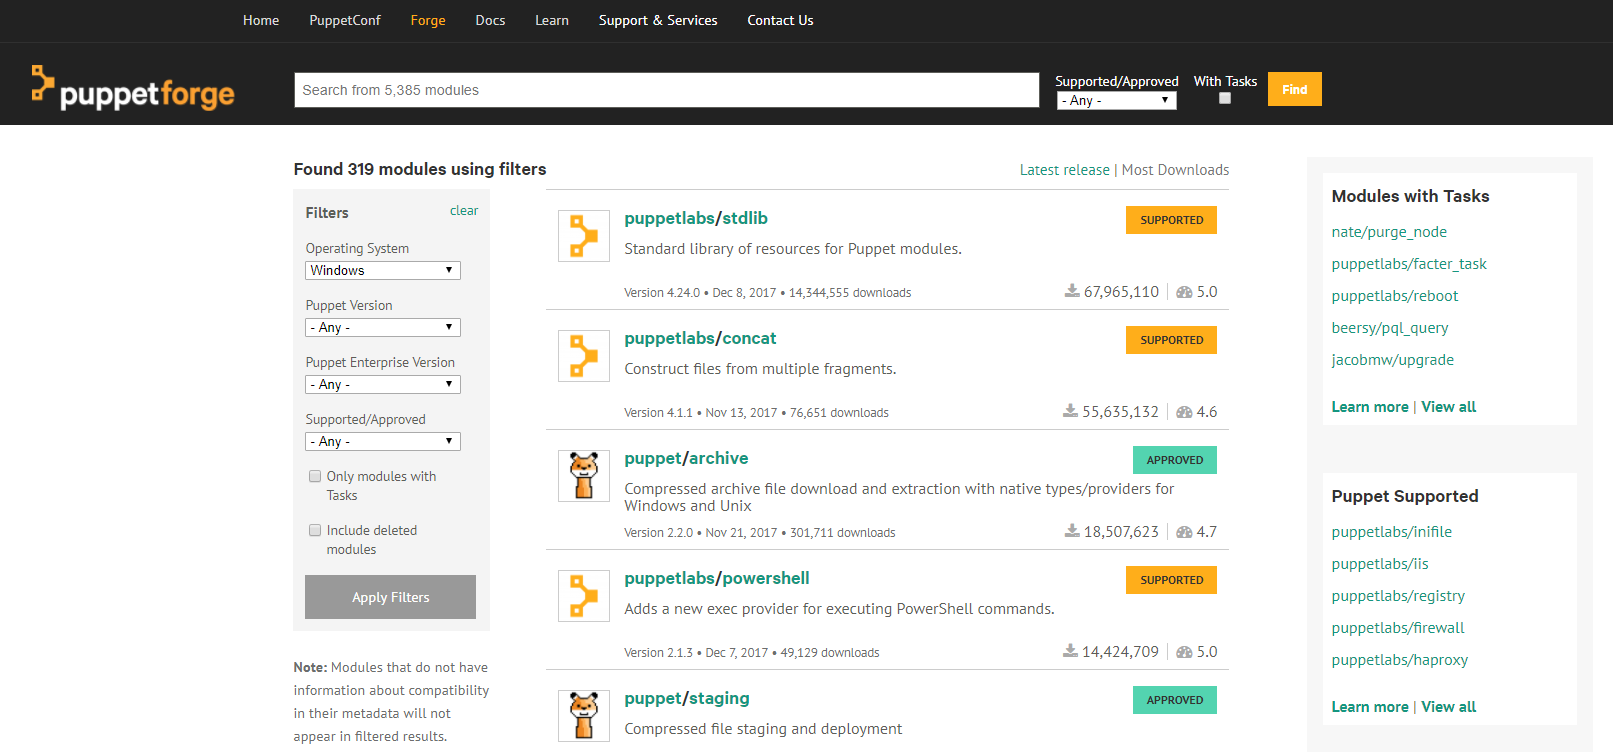
While you could write all of your own Puppet code from scratch, you can save significant time and effort by using public Puppet modules from the Forge.
There are modules covering a large number of common software packages. Many of these modules are officially supported and maintained by Puppet. A significant number of others are “Puppet Approved” which means they’ve been checked to ensure they meet certain quality standards.
If you previously followed my Getting Started with Puppet post, we already made use of one public module: chocolatey. We did this by downloading the module via the following command:
puppet module install chocolatey
And then utilised it in our manifests by adding include chocolatey. You can also download modules from the Forge as an archive and extract them manually.
r10k
While you can download and install modules from the Forge via the above method, Puppet has a tool named r10k which provides a better solution.
Manually downloading modules has several disadvantages:
- Your code becomes cluttered with external code
- You fail to benefit from future bugfixes/features without manually updating the modules
- Any modifications you might make to the modules diverges them from their origins, making them difficult to maintain in the future
r10k is a module management tool that eliminates these problems. Instead of downloading modules directly, you create a special text file called a puppetfile with metadata that tells r10k how to manage the contents of your \modules directory.
Why is it called r10k?
“It’s called r10k because I’m terrible at names. When I started working on r10k I couldn’t come up with a decent name. While trying to come up with something clever, I recalled that Randall Munroe wrote a bot for controlling IRC chatter, and gave it the most generic name he could think of - Robot 9000. Since I just needed a name, any name, I decided to go with an equally generic name by incrementing the robot index.” - Adrien Thebo (creator of r10k)
Installing r10k on Windows
Before you can use r10k on Windows you need to install it. This involves adding it as a Ruby Gem to the Puppet agents version of Ruby (which is distinct from the system version of Ruby if you happen to have Ruby installed). You can do this with Puppet by using the Puppet-Gem provider as follows:
package { 'r10k':
  ensure   => installed,
  provider => puppet_gem,
}
This installs r10k in to the C:\Program Files\Puppet Labs\Puppet\sys\ruby\bin directory. You can also do a manual install by switching to this directory and running:
gem install r10k
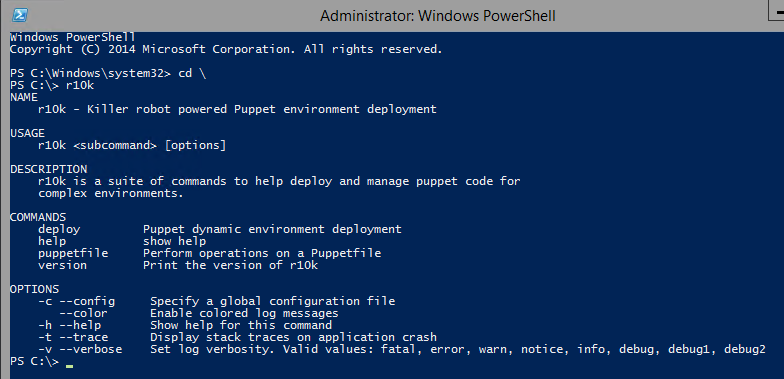
This directory is not part of your PATH environment variable by default, so if you want to be able to access r10k from any directory, you need to also add C:\Program Files\Puppet Labs\Puppet\sys\ruby\bin to your system PATH variable and then close and reopen your console window for this to take effect. You should now be able to run r10k:
Finally, (on Windows 2012 R2 at least) I found that when using r10k it would throw an SSL error:
ERROR -> SSL_connect returned=1 errno=0 state=error: certificate verify failed
This seems to be a known issue (you might want to check you’re affected by it first before applying this fix). Glenn Sarti (a Windows Dev at Puppet) provides a workaround for this (which I’ve duplicated but slightly modified below) which involves executing the following PowerShell to download a complete SSL bundle from the CURL website (my version permanently adds the SSL_CERT_FILE to the system environment variables):
$CACertFile = Join-Path -Path $ENV:AppData -ChildPath 'RubyCACert.pem'

If (-Not (Test-Path -Path $CACertFile)) {
  "Downloading CA Cert bundle.."
  [Net.ServicePointManager]::SecurityProtocol = [Net.SecurityProtocolType]::Tls12
  Invoke-WebRequest -Uri 'https://curl.haxx.se/ca/cacert.pem' -UseBasicParsing -OutFile $CACertFile | Out-Null
}

"Setting CA Certificate store set to $CACertFile.."
$ENV:SSL_CERT_FILE = $CACertFile
[System.Environment]::SetEnvironmentVariable('SSL_CERT_FILE',$CACertFile, [System.EnvironmentVariableTarget]::Machine)
Using r10k
You can now make use of r10k to manage your modules. As an example, lets install stdlib which is one of the oldest modules in the Forge.
Stdlib extends Puppet with a a collection of useful functions, facts, types and providers. For example:
count- If called with only an array, counts the number of elements that are not nil or undef. If called with a second argument, counts the number of elements in an array that matches the second argument.dirname- Returns the directory part of a path.ensure_packagesis a better alternative to using thepackageresource directly as it stops errors occurring where the same package might be declared in your code more than once. This might particularly might occur where packages are declared within a module.file_line- Ensures that a given line is contained within a file, or can be used to modify or or more lines in place by matching them with a regular expression.pry()is a useful debugging tool. It allows you to pause execution of your manifest at a specified place and enter an interactive debugger where you can runcatalogto inspect Puppet’s catalog, which contains all the resources currently declared in your manifest. When you’re finished you typeexitto resume execution.- .. and many more.
Many Puppet modules make heavy use of this standard library and you should always check if a function exists in stdlib before considering rolling your own.
To use r10k to install stdlib create a new text file named puppetfile (with no extension) in your \production environment directory (e.g C:\ProgramData\PuppetLabs\code\environments\production) and then give it the following content:
forge 'http://forge.puppetlabs.com'

mod 'puppetlabs/stdlib', '4.24.0'
The forge line defines the repository that contains the modules (because you can have private/internal ones). The mod line defines the module to be installed, with it’s name and specific version as two parameters.
Change to this directory if you’re not in it and then execute r10k as follows (this uses the optional --verbose flag to give more detailed output):
cd C:\ProgramData\PuppetLabs\code\environments\production\
r10k puppetfile install --verbose
You should now see a stlib directory under \modules.
Module dependencies
Many modules are dependent on the presence of other modules and r10k does not manage these dependencies by default. To assist with generating a puppetfile that includes all the dependent modules you can use the generate-puppetfile tool.
To install generate-puppetfile, execute the following:
gem install generate-puppetfile
– If you haven’t modified your PATH variable as suggested earlier, you will need to specify the full path C:\Program Files\Puppet Labs\Puppet\sys\ruby\bin to use gem and generate-puppetfile.
Alternatively you can use the puppet_gem provider to have Puppet install the gem:
package { 'generate-puppetfile':
  ensure   => installed,
  provider => puppet_gem,
}
Once generate-puppetfile is installed you can use it follows:
– You can also specify multiple modules in a single command by separating their names with spaces.
generate-puppetfile puppet/archive
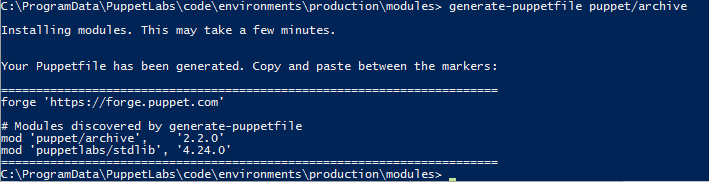
Here we can see that the puppet/archive module is dependent on puppetlabs/stdlib and as such it has output the required puppetfile text to ensure we install both modules.
Once you have a pre-existing puppetfile, you can also use this tool to generate an updated version of the file, by having it return a version with all the latest available versions for the modules. You do this as follows (assumes you’re in the same directory as your puppetfile):
generate-puppetfile -p .\puppetfile
Using modules in your manifests
The capabilities of a module vary dependent on its purpose. Some modules might just add new resource types or providers. Others might also install software that can then be managed by its resource types or providers.
If you followed along earlier you will now have the puppet\archive module installed along with its dependent stdlib. As described earlier, stdlib is providing us with various functions. Archive provides us with the ability to manage compressed files. As such it doesn’t install or modify any software, so having add it to our \Modules directory we can utilise it in our manifests simply by invoking it’s resource declaration. For example:
archive { 'c:/temp/some-archive.zip':
  ensure => present,
  extract => true,
  extract_path => 'c:/temp',
  creates => 'c:/temp/some-archive',
  cleanup => false,
}
This would extract c:\temp\some-archive.zip, to c:\temp\ only if the c:\temp\some-archive folder didn’t already exist. The cleanup => false setting tells it not to remove the original archive after performing the extract.
In contrast, the Puppetlabs/Chocolatey module has the capability to install Chocolatey. To trigger this installation to occur (once you have added the module to your \modules directory), we add an include statement to our manifest:
Include Chocolatey
After which we can then manage packages using the package resource type with the newly added attribute of provider => chocolatey.
To best understand what capabilities a module adds, have a look at its associated readme section on the Forge. I also recommend you look at the examples section to see whether or not you might need or want to use Include.
Creating your own modules
In this section we will author a module that could be used to manage the Windows time service (this is just to act as an example, in reality you’re likely better off using this Windows time module that already exists).
“A good module for some software should not define how you want the software [configured] but provide an API so that the software can be used on multiple platforms without needing to know the intricacies of that platform.” - Getting Started with Puppet Development
Modules have a standard directory structure to allow Puppet to find the manifest files, templates and any other components. While you can create the directories your module needs manually, you can also use puppet module generate to bootstrap the process. This has the added advantage of creating the metadata.json file for you via a series of prompts, which is used to describe the module (and is essential if you plan to publish the module to the Forge).
To create our Windows Time module, perform the following:
- Navigate to your module directory:
cd C:\ProgramData\PuppetLabs\code\environments\production\modules - Generate the module as follows (obviously change my name to your name – this identifies the author of the module):
puppet module generate markwragg/windows_ntp - Answer the question prompts (you can hit enter to accept some of them with default values).
- Navigate to
windows_ntp\manifestsand modify theinit.pptemplate to have the following content:class windows_ntp { registry::value { 'NtpServer': key => 'HKEY_LOCAL_MACHINE\SYSTEM\CurrentControlSet\Services\W32Time\Parameters', data => 'time.windows.com,0x9', } service { 'w32time': ensure => running, enable => true, } }We can now make use of our module by adding
include windows_ntpto a manifest file to execute the class. If you’d like to test the module works without adding it to a manifest, you can do the following:puppet apply -e 'include windows_ntp'You could now publish this module to the Puppet Forge. You could also/alternatively publish the module to a Git repository. If you do so (and ensure you also add a git release tag via
git tag) you can then user10kto install your module by adding the following to yourpuppetfile:mod 'windows_ntp', :git => 'https://github.com/yourusername/windows_ntp.git', :tag => '0.1.1'Changing the above values as appropriate, and ensuring that you don’t forget to include the other modules that this depends on:
mod 'puppetlabs/stdlib', '4.24.0'
mod 'puppetlabs-registry', '2.0.1'
Summary
This post has been an introduction to Puppet modules and how to find, use, manage and author them. If you’d like to learn more, I suggest the following links:
- Managing Code with r10k
- Module Fundamentals
- Getting Started: Writing modules for Windows
- The Puppet Language Style Guide – You should refer to this to ensure any modules you author follow the recommended best practices.


Comments