
I’m just starting to get my head around the concept of Containers and as such decided to take Windows Server 2016 Technical Preview 5 for a spin, which includes Docker Containers as a feature. It’s potentially worth being more explicit here (for anyone not aware) that this isn’t Microsoft’s version of Containers, this is actually Docker baked in to Server 2016. That’s a pretty cool move on Microsoft’s part.
Things were already getting pretty meta in trying to run a Container inside a Virtual Machine on my desktop, but an early challenge I experienced in testing this out was getting the Hyper-V feature to install within a VM running under VirtualBox. The short answer seems to be you can’t, due to a lack of support for Nested Virtualisation despite someone asking for the feature seven years ago.
– This doesn’t mean you can’t test Server 2016 via VirtualBox btw, you just definitely can’t test out Hyper-V containers. What’s a Hyper-V container you ask?
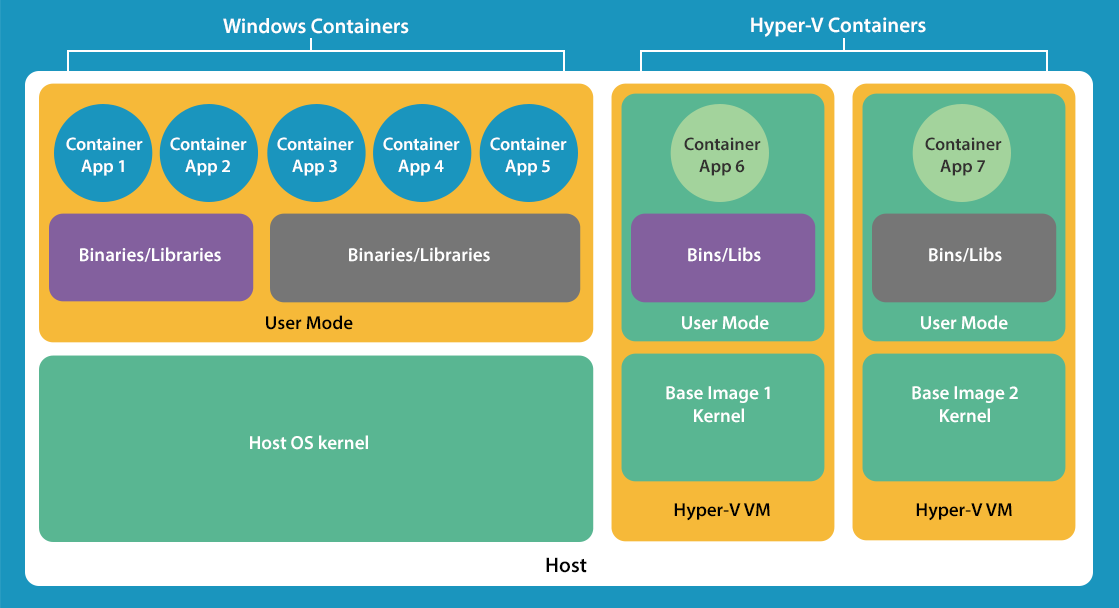
Windows Containers
- Multiple container instances can run concurrently on a host, with isolation provided through namespace, resource control, and process isolation technologies. Windows Server containers share the same kernel with the host, as well as each other.
Hyper-V Containers
- Multiple container instances can run concurrently on a host; however, each container runs inside of a special virtual machine. This provides kernel level isolation between each Hyper-V container and the container host.
Source: MSDN: Hyper-V Containers
– In summary, a Hyper-V container is more isolated. Containers are like living in a gated community, but a Hyper-V Container also lives in a cave in the woods.
As I’ve noted previously, I suspect the Hyper-V feature on Windows 8/10 may support nested virtualisation, but as i’m currently driving Windows 7 that wasn’t an option for me, so instead I set up my Virtual Machine using VMWare Workstation 12 Player.
If you haven’t yet installed Windows Server 2016 see my previous post on how I went about it and this post for a little more detail on basic setup if you want to use Server Core.
Either way (to core or not to core) the next steps are as follows:
– The steps i’m about to describe are also covered in the MSDN Windows Containers Quick Start guide and I strongly advise you check there first to ensure you have the latest information.
1. Configure your server to be a Container Host
There’s a little more to doing this than just installing the Containers feature surprisingly (although that is the first step). However Microsoft have made this very easy by providing a Powershell script that does all the work (yay automation!) per Step 2 of the Quick Start guide.
Log in to your machine and run Powershell. We’re going to deploy to an existing system, so we should use the “Existing System” part of the guide. First you can download the Powershell script by executing this command:
wget -uri https://aka.ms/tp5/Install-ContainerHost -OutFile C:\Install-ContainerHost.ps1
And then this to configure the system to host Hyper-V and Windows Containers:
powershell.exe -NoProfile -ExecutionPolicy Bypass C:\Install-ContainerHost.ps1 -HyperV
– If you don’t want to test out Hyper-V containers you can omit the -HyperV switch and I believe it will configure the server for Windows Containers instead.
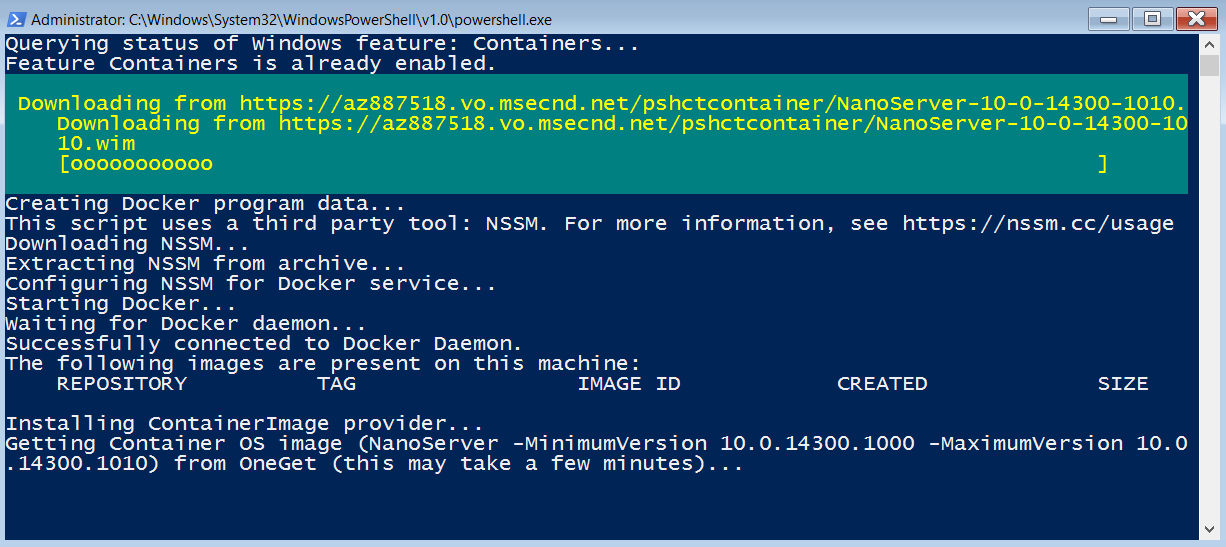
This installs the required features and performs reboots. It will automatically resume when you login after boot (it sets up a logon task to do so). This takes a short while (depending on your bandwidth) as it downloads a Windows Nano Server image file via OneGet. Here’s what it looks like while it’s downloading:
When it’s done the script will retun “Script complete!” as well as list the available Docker images (which you can get at any time with docker images). If you’re testing out Hyper-V containers you should see a ‘nanoserver’ image with a a tag of latest:
Base image is now tagged:
nanoserver   10.0.14300.1010   9db95268a387   6 weeks ago   817.1 MB
nanoserver   latest            9db95268a387   6 weeks ago   817.1 MB
If you’re testing Windows Containers, it will have downloaded you a ‘windowsservercore’ image instead.
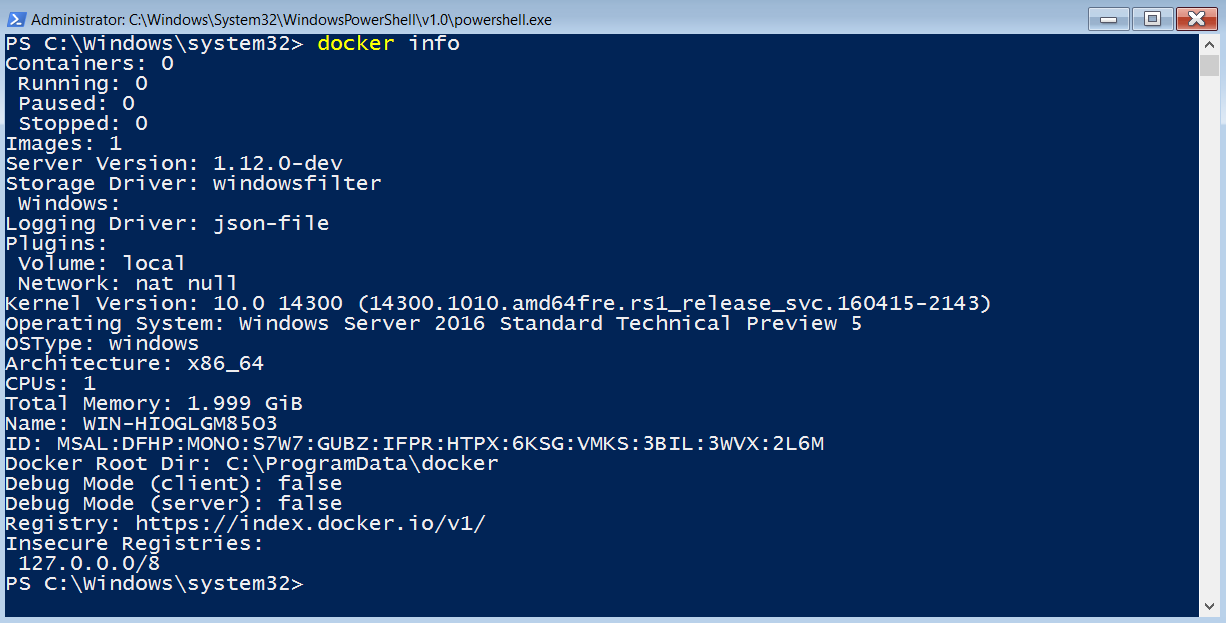
To see Docker system info (and confirm its working), type docker info:
To see what else you can do with Docker type Docker --help.
2. Configure a Container
If you’ve configured your Container Host to run Hyper-V containers, you should now move to part 4 of the Quick Start guide (part 3 covers Windows Containers). Again I will summarise the steps, but I recommend checking the guide directly for the latest info.
– This is particularly relevant advice, because this documentation is open source and in GitHub where anyone can submit improvements, so it’s likely to see regular improvements.
Create a directory named c:\share\en-us. If you’re working in Server Core you can do this with Powershell by executing:
New-Item -Type Directory c:\share\en-us
“Hyper-V containers use the Nano Server base OS image. Because Nano Server is light weight operating system and does not include the IIS package, this needs to be obtained in order to complete this exercise. This can be found on the Window Server 2016 technical preview media under the NanoServer\Packages directory.”
Ensure you have the Server 2016 TP5 ISO media still mounted to a CD Drive as D:\. Then copy the IIS package files to your container host by executing:
Copy-Item D:\NanoServer\Packages\Microsoft-NanoServer-IIS-Package.cab C:\share
Copy-Item D:\NanoServer\Packages\en-us\Microsoft-NanoServer-IIS-Package_en-us.cab C:\share\en-us
Create a file in the c:\share folder named unattend.xml and copy the following text into the unattend.xml file:
<?xml version="1.0" encoding="utf-8"?>
    <unattend xmlns="urn:schemas-microsoft-com:unattend">
    <servicing>
        <package action="install">
            <assemblyIdentity name="Microsoft-NanoServer-IIS-Feature-Package" version="10.0.14300.1000" processorArchitecture="amd64" publicKeyToken="31bf3856ad364e35" language="neutral" />
            <source location="c:\iisinstall\Microsoft-NanoServer-IIS-Package.cab" />
        </package>
        <package action="install">
            <assemblyIdentity name="Microsoft-NanoServer-IIS-Feature-Package" version="10.0.14300.1000" processorArchitecture="amd64" publicKeyToken="31bf3856ad364e35" language="en-US" />
            <source location="c:\iisinstall\en-us\Microsoft-NanoServer-IIS-Package_en-us.cab" />
        </package>
    </servicing>
    <cpi:offlineImage cpi:source="" xmlns:cpi="urn:schemas-microsoft-com:cpi" />
</unattend>
– Even in Server Core you can do this by just running notepad.
Your C:\Share directory should now look like this:
c:\share
|-- en-us
|    |-- Microsoft-NanoServer-IIS-Package_en-us.cab
|
|-- Microsoft-NanoServer-IIS-Package.cab
|-- unattend.xml
3. Start a Container
Per the quickstart guide:
“To create a Hyper-V container using docker, specify the –isolation=hyperv parameter. This example mounts the c:\share directory from the host, to the c:\iisinstall directory of the container, and then creates an interactive shell session with the container.”
Execute this:
docker run --name iisnanobase -it -p 80:80 -v c:\share:c:\iisinstall --isolation=hyperv nanoserver cmd
– Potential Issues:
If you get an error similar to the below, you may need to ensure your host Virtual Machine has at least 2 CPU cores:
If it doesn’t have at least 2 cores, edit the VM to increase the cores and reboot. After rebooting, you then need to delete your container with docker rm iisnanobase before rerunning the docker run command above.
If you’re using Hyper-V under Windows 10 and get this error, you may be running a Build of Windows 10 that does not support Nested Virtualisation.
Use winver to check if you have Build 10565 or later. If you don’t, update via Windows Update.
– End of issues.
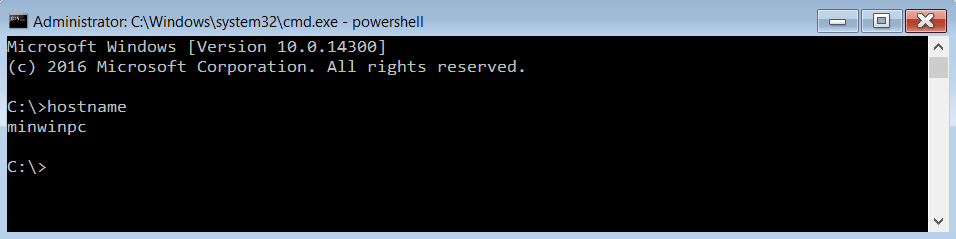
If you now find yourself in a cmd prompt and hostname returns minwinpc, congratulations, you’re officially inside a running container!
4. Create IIS web server container image
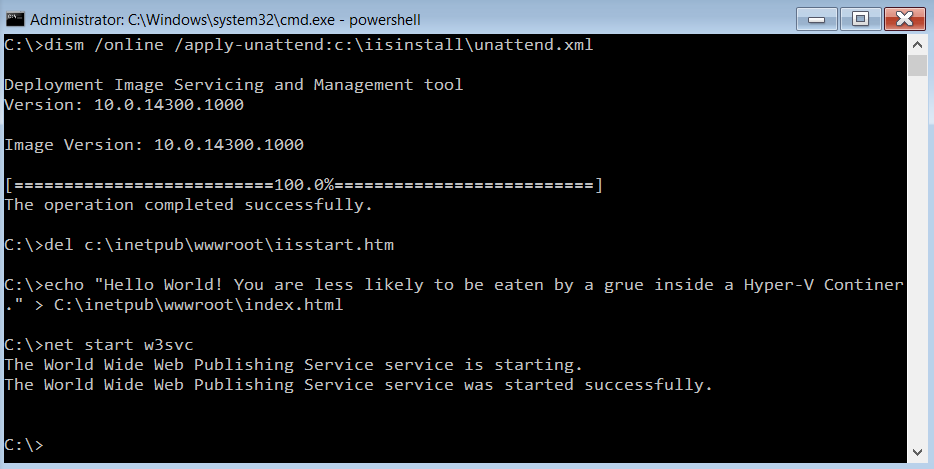
“From within the container shell session, IIS can be installed using dism. Run the following commands to install IIS in the container.”
The quick start guide next takes you through configuring IIS within your nano server. This is done by accessing the share we mounted when we ran the container. Execute the following commands:
dism /online /apply-unattend:c:\iisinstall\unattend.xml
del C:\inetpub\wwwroot\iisstart.htm
echo "Hello World! You are less likely to be eaten by a grue inside a Hyper-V Container" > C:\inetpub\wwwroot\index.html
net start w3svc
– What’s a continer?
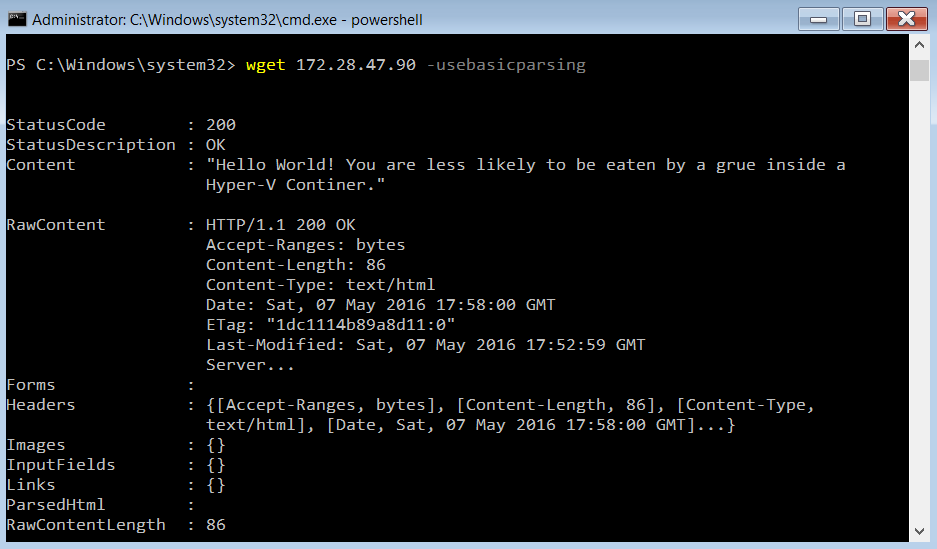
Execute ipconfig to get the IP address of your container, then run Internet Explorer on your Container Host to check IIS is serving content on that IP address. If (like me) your Container Host is server core, IE will not be an option. Instead, open a cmd prompt back on your container host (you can use CTRL+ALT+DEL > Task Manager to do this without exiting from the cmd shell of your container), run Powershell and execute:
invoke-webrequest <your ipaddress> -usebasicparsing
5. Commit your configured container to the local repository
You can now commit your configured container to the local image repository, so that each time you want to start it it’s preconfigured in this way. Before you can do this the container needs to be in a stopped state.
Enter exit in the cmd shell of your running container. This will return it to a stopped state, as you can see by entering docker info.
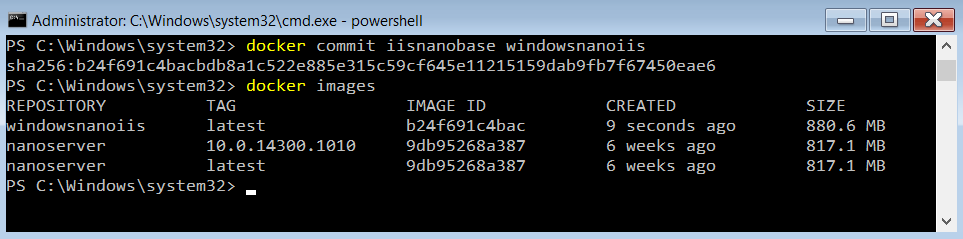
Following this you can commit the container to the image repository by entering:
docker commit iisnanobase windowsnanoiis
You can see your committed container is in the repository by entering:
docker images
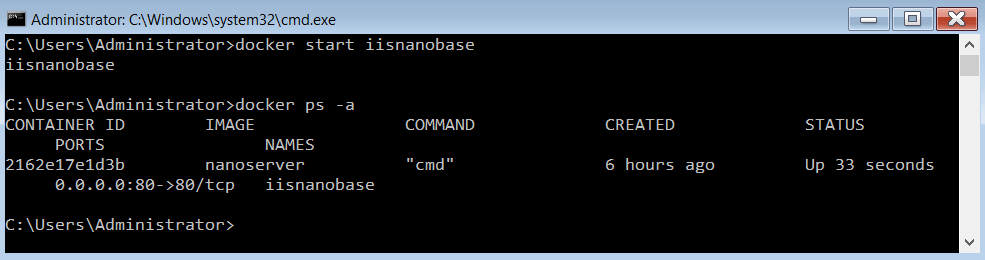
And you can start your container running again (if you wish) by entering:

docker start iisnanobase
– I had an issue getting this to work until I rebooted. Its not clear whether this was an issue with my virtual environment or a bug in TP5.
You can see your running containers with docker ps (include the -a switch to see all containers, including those not running).
Further Reading
- MSDN article on managing Hyper-V Containers
- MSDN article on managing Windows Containers
- Get started with Docker for Windows a good guide that explains the basic concepts.


Comments