
I recently needed to make a change to the membership of an Active Directory group which was enforced via Puppet. While waiting for the Puppet manifest to apply I used Get-ADGroupMember in PowerShell to check if the change had taken effect. Finding that it had not, I then wrote a crude loop to continually check the group membership until it changed. It occurred to me that this kind of functionality might be useful as a cmdlet and as such I have created Watch-Command. This blog post details how it works as well as some inventive but controversial design decisions I made.

While working on this cmdlet I discovered that Lee Holmes provides a very similar cmdlet as part of his Windows PowerShell Cookbook. While I didn’t see his version until mine was mostly formed, it takes a very similar but simpler approach and you might want to check it out.
If you want to try my version of Watch-Command, it is available via a module named Watch in the PowerShell Gallery. If you have PS5 or newer you can install it via:
Install-Module Watch -Scope CurrentUser
There are three different ways to use the cmdlet. The most straightforward is to provide it with a ScriptBlock as input. You define a ScriptBlock by wrapping one or more commands in curly braces { .. }. For example:
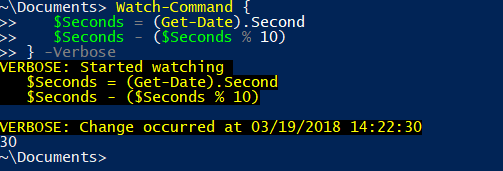
Watch-Command {
   $Seconds = (Get-Date).Second
   $Seconds - ($Seconds % 10)
} -Verbose
This gets the seconds portion of the current time and rounds it down to the nearest ten (using the mod % math operator). Watch-Command will therefore repeat this every second (by default) until the second count moves in to the next ten.
If you want Watch-Command to run continuously you can add the -Continuous switch:
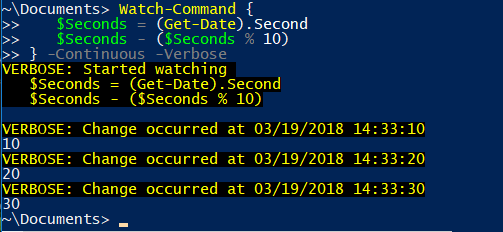
Watch-Command {
   $Seconds = (Get-Date).Second
   $Seconds - ($Seconds % 10)
} -Continuous -Verbose
When you want it to stop, just press CTRL+C.
The second way you can use the cmdlet is to provide a ScriptBlock via the pipeline. For example:
{ Get-Date } | Watch-Command
The third and final way to use the cmdlet is where things get controversial. It occurred to me that if you had a very long command you’d already entered in to the console, it could be slightly annoying to have to cursor back to the beginning and end of that command to wrap it in curly braces. Ideally you would just want to be able to up arrow and throw | Watch-Command at the end of a pipeline, and have it take on repeat execution of the command.
The cmdlet allows you to do just that:
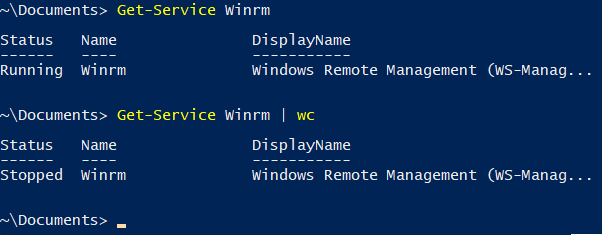
In this example we’re checking the winrm service and then waiting for it to change (this example also uses the wc alias for Watch-Command).
This is controversial because by doing this I don’t handle the pipeline the way a cmdlet should.
Although the object produced by the pipeline that proceeded Watch-Cmdlet is sent to the -ScriptBlock parameter, if it is not a ScriptBlock I throw it away and replace it with whatever commands preceeded the cmdlet in the pipeline.
How does this work?
I discovered I could get the commandline that invoked the cmdlet via the automatic variable $MyInvocation and (specifically) its .Line property.
$MyInvocationis an automatic variable available within scripts, functions and script blocks that contains information about the current command, such as the name, parameters, parameter values and information about how the command was started or invoked.
Here’s an example function that exposes $MyInvocation:
Function Show-MyInvocation {
Param(
[parameter(ValueFromPipeline)]
$InputObject
)
$MyInvocation
}
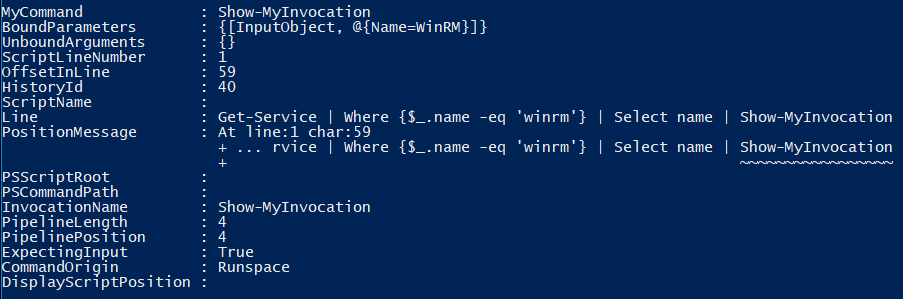
Get-Service | Where {$_.name -eq 'winrm'} | Select name | Show-MyInvocation
The Watch-Command cmdlet uses several properties of $MyInvocation as follows:
if ($ScriptBlock -isnot [scriptblock]){
    if ($MyInvocation.PipelinePosition -gt 1){
        $ScriptBlock = [Scriptblock]::Create( ($MyInvocation.Line -Split "\|\s*$($MyInvocation.InvocationName)")[0] )
    }
    else{
        Throw 'The -ScriptBlock parameter must be provided an object of type ScriptBlock unless invoked via the Pipeline.'
    }
}
First it checks that it has’t received a ScriptBlock type object. If it hasn’t, then it uses the PipelinePositon property (which tells it how many commands preceded it) to check that there was at least one command before it in the pipeline (without which we have nothing to process).
It then uses -Split and a Regular Expression to find where its cmdlet name appears in the Line property next to a | and zero or more spaces. It uses the $MyInvocation.InvocationName property to reference its own cmdlet name so that if it was invoked via an Alias it remains correct.
Having got the command, it then uses the [ScriptBlock]::Create method to convert the string to a scriptblock.
Usage Examples
The default behaviour of Watch-Command is just to run some block of code and then return the full result as soon as the output changes from its first iteration.
However you can also add a -Difference switch to have it only return the differences between the first and changed result. This comparison is performed via the Compare-Object cmdlet, and then we only return the right-side changes from that cmdlet. This is so that generally you get just one result (e.g the change), vs it returning what it was before and after the change.
By using -Difference with -Continuous you can use Watch-Command to perform ongoing monitoring of state changes. For example:
Get-Service | Watch-Command -Diff -Cont -Verbose
This will show ongoing output each time a service changes state:

Having used the -Verbose switch you can see (in the output above) which specific properties are being ‘watched’. By default the cmdlet will look to see if the command being executed returns a Default Display Set. If one exists, it uses these properties by default in order to limit how many properties are being monitored to a sensible set of defaults. If there isn’t a Default Display Set then by default it monitors all properties.
If you want to explicitly specify what properties are monitored, you can do so with the -Property parameter. Here’s an example of where this might be useful:
Get-Process | Watch-Command -Diff -Cont -Property id
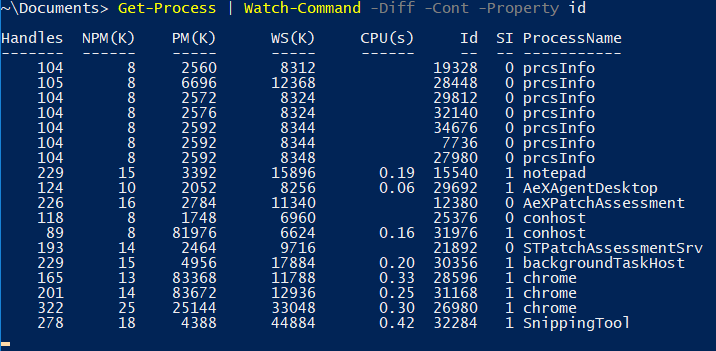
By default, Get-Process displays Id, Handles, CPU, SI and Name properties. Obviously the result of CPU changes frequently, so if we want to set up Watch-Command to report to us only when new processes start, we can just monitor the Id property.
If you want to force the command to monitor all object properties (where there is a Default Display Set taking precedence) you can do so by specifying -Property *.
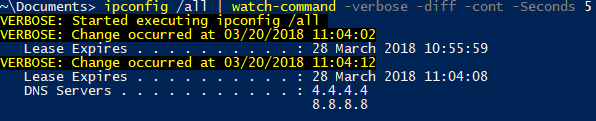
You can use Watch-Command to monitor non-PowerShell command output also (which will generally be treated as strings). Here’s an example of monitoring the output of ipconfig /all for a change to the DNS server addresses:
There are a few other way to customise your use of Watch-Command:
- Per the above example, if you want to change the delay between checks, you can specify it with the
-Secondsparameter. You can set this to0if you want the checks to occur at the speed of PowerShell. - If you want to forcibly convert the output of you command to an array of strings for the comparison, you can use the
-AsStringparameter. When comparing strings, no specific object properties are monitored (unless you specify one) as you probably want to monitor changes to the string values, vs one of the string objects properties.
For full details of the parameters and some further examples, have a look at Get-Help Watch-Command -Full.
Summary
This post has been a quick overview of the Watch-Command cmdlet. If you want to look at the code for the function in full, you can see it in Github here.


Comments