
I maintain a number of PowerShell modules in GitHub, and use an Azure DevOps pipeline to build, test and publish changes to the modules. While making some improvements to one of the modules recently, I noticed that an early step in the pipeline was taking a few minutes to run each time, and wondered if there might be a way to speed it up. I discovered Azure DevOps has a task called Cache, which can be used for exactly this purpose. This blog post describes how my PowerShell build pipeline works, and how the Cache task reduced the time it took to run one of the tasks from around 3 minutes, to a few seconds.
About pipeline caching
You can learn more about pipeline caching via the Azure DevOps documentation in Microsoft Learn.
The Azure Pipelines agent is also open source, so you can review the actual implementation to see how the mechanism underneath works, which is as follows:
- Fingerprinting: when accessing the cache, you provide a
keyinput value, which is then split by uses of the|character. Each segment is either treated as a literal string (if it’s quoted, or doesn’t look like a path), or expanded as a file path/glob and SHA256-hashed. The hashes are combined into a single fingerprint. (FingerprintCreator.cs) - Metadata lookup: the fingerprint is checked against existing cache entries via a metadata API call, to determine if there is a cache miss or hit (PipelineCacheServer.cs)
- Content storage: the actual files are uploaded and downloaded through a
DedupManifestArtifactClientAzure DevOps shared, chunk-level deduplication blob store, which is also used for Pipeline Artifacts and Universal Packages. Uploads and downloads from this store execute very quickly due to chunking and streaming.
When you add the Cache task to a pipeline, two tasks actually execute during the runtime:
- The cache task executes at the point you added it to the pipeline. It computes the fingerprint described above and checks for a matching cache entry. If there is a cache hit, the task downloads the files via the dedup client. On a miss the task immediately terminates. (RestorePipelineCacheV0.cs)
- At the end of your pipeline execution, a post-job task executes, but only if the main pipeline steps succeeded and the matching restore step actually ran, to avoid caching broken files. If there was a cache hit in the earlier task, the post-job terminates as the file/s are already cached. If there was a miss, the pipeline compresses the files into a tar and uploads them via the dedup client. (SavePipelineCacheV0.cs)
Files in the cache automatically expire after 7 days, but every time you use the files in the cache this clock is reset. It is also worth noting that caches are scoped by Project, Pipeline and Branch. A feature branch can read/restore caches from the main or master branch, but it can only upload/overwrite a cache key that belongs to its own branch. This prevents a rogue PR from potentially poisoning the cache.
There’s no cost to use the service (even when using the free tier of Azure DevOps), and no enforced limit on the size or number of files you can store in the cache.
Note also that it is not always guaranteed that using Caching will improve performance, and is very dependent on your specific scenario.
Caching is most effective when the time required to restore and save the cache is less than the time it takes to regenerate the files. However, in some cases, caching may not provide performance benefits and could even negatively impact build time. It’s important to evaluate your specific scenario to determine whether caching is the right approach.
– https://learn.microsoft.com/en-us/azure/devops/pipelines/release/caching
Read on below to see how this task benefited my specific use case.
My pipeline
My PowerShell pipelines were originally executed via a CI/CD tool called AppVeyor (pre-dating Azure DevOps), and the original tasks/structure were borrowed from other giants of the PowerShell community (I think predominantly Warren Frame). Later I decided to port the pipeline to Azure DevOps, partly as a learning exercise as it was becoming increasingly common in my day to day work. Following the port, the structure of the pipeline didn’t change much (and still hasn’t), and works as follows:
- The pipeline executes automatically for any changes to the master branch, or for any PRs that would merge into master:
variables:
- group: powershell-gallery

# Build Pipeline
pool:
  # What environment will the build agent run on? (Windows / Linux / macOS)
  vmImage: "windows-latest"

trigger:
  batch: true

  # What branches will trigger a build?
  branches:
    include:
      # Any Pull Request merging into the master branch
      - master

pr:
  branches:
    include:
      - master
- It first installs the PSDepend PowerShell module, which is a PowerShell dependency handler. This takes a simple psd1 file as input, which contains a list of modules that the build pipeline depends on for other tasks, and installs those modules if they aren’t already present. The modules my build pipeline depends on include:
- BuildHelpers
- Pester
- PlatyPS
- PSake
- PSDeploy
- PSScriptAnalyzer
- powershell: |
      .\Build\build.ps1 -ResolveDependency -TaskList 'Init'
    displayName: "Install Dependencies"
- PSDepend installs specific versions of these modules, to ensure my builds continue to run as expected even when these modules are changed / updated.
-
Using tasks grouped by PSake, the rest of the build pipeline then executes the following stages:
- Builds the PowerShell module into a single psm1 file. In the repository, each cmdlet / function is maintained as separate files, but this impacts performance when Importing the module, which is resolved by publishing the module as a single file.
- Runs PSScriptAnalyzer to ensure the module implements good PowerShell practices
- Executes the Pester unit tests to ensure the latest changes have not broken any existing functionality and work as expected. This task also calculates code coverage, and updates the Readme.md with the resulting coverage percentage as a badge.
- Exports the PowerShell help output for each public cmdlet in the module into a markdown file, that is then later published back into the repo.
- If a deployment is required (which is determined by whether or not a
# !Deploysection has been added to the changelog.md, as I previously described in this blog post on changelog driven deployments), and the build is executing against Master, a task runs to publish the latest version of the module in the PowerShell Gallery. - Publishes the updated Documentation and Readme markdown files back to the GitHub repo.
- Publishes the results of the Pester tests into the Test area of the Azure DevOps build.
- Publishes the PowerShell module as an output artifact of the Azure DevOps build (where it could then be consumed directly by other Azure DevOps pipelines if desired).
  - powershell: |
      .\Build\build.ps1 -TaskList 'CombineFunctionsAndStage'
    displayName: "Combine PowerShell functions into single module file"

  - powershell: |
      .\Build\build.ps1 -TaskList 'Analyze'
    displayName: "Analyze"

  - powershell: |
      .\Build\build.ps1 -TaskList 'Test'
    displayName: "Test"

  - powershell: |
      .\Build\build.ps1 -TaskList 'UpdateDocumentation'
    displayName: "Update Documentation"

  - powershell: |
      .\Build\build.ps1 -TaskList 'UpdateWiki'
    displayName: "Update Wiki"
    condition: and(succeeded(), ne(variables['Build.Reason'], 'PullRequest'))
    env:
      GITHUBPAT: $(GitHubPAT)

  - powershell: |
      .\Build\build.ps1 -TaskList 'Deploy'
    displayName: "Deploy"
    condition: and(succeeded(), ne(variables['Build.Reason'], 'PullRequest'))
    env:
      NugetApiKey: $(NugetApiKey)

  - powershell: |
      .\Build\build.ps1 -TaskList 'Commit'
    displayName: "Commit Changes"
    condition: and(succeeded(), ne(variables['Build.Reason'], 'PullRequest'))

  - powershell: |
      .\Build\build.ps1 -TaskList 'CreateBuildArtifact'
    displayName: "Create Build Artifact"

  - task: PublishTestResults@2
    displayName: "Publish Pester Tests"
    inputs:
      testRunner: "NUnit"
      searchFolder: "Artifacts"
      testRunTitle: "PesterTests"
    condition: always()

  - task: PublishBuildArtifacts@1
    displayName: "Publish Artifact: PowerShell Module Zipped for offline use"
    inputs:
      PathtoPublish: Artifacts
      ArtifactName: Artifacts
    condition: always()

  - task: PublishBuildArtifacts@1
    displayName: "Publish Artifact: PowerShell Module"
    inputs:
      PathtoPublish: Staging
      ArtifactName: PSModule
    condition: always()
The performance issue
The two longest running tasks in the pipeline were the Install Dependencies task, which as described above, needed to install specific versions of 6 different PowerShell modules, and the Test task, which executes the Pester tests (which varies for each module depending on how many test there are to execute).
Due to the multiple calls to the PowerShell Gallery, the install dependencies task was taking around 3 minutes:
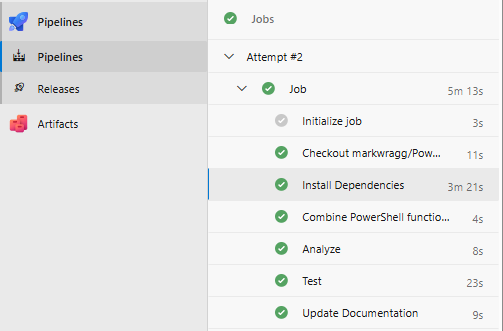
While this isn’t a particularly long period of time, during periods of active development I would sometimes be executing the pipeline multiple times in a row (particularly if there were issues with the unit tests), and the delay was impacting my ability to progress changes.
The cache task solution
The solution was to add the Cache task before the install dependencies task in the pipeline as follows:
  - powershell: |
      $modulesPath = ($env:PSModulePath -split [IO.Path]::PathSeparator) |
          Where-Object { $_ -like "$HOME*" } | Select-Object -First 1
      Write-Host "##vso[task.setvariable variable=ModulesPath]$modulesPath"
    displayName: "Set Modules Cache Path"

  - task: Cache@2
    displayName: "Cache PowerShell Modules"
    inputs:
      key: 'psmodules | "$(Agent.OS)" | Build/build.depend.psd1'
      restoreKeys: |
        psmodules | "$(Agent.OS)"
      path: "$(ModulesPath)"
First we determine the default PowerShell modules install path. This is derived from the PSModulePath environment variable, and filters for the path that includes the current users home directory. This task is designed to be agnostic, so you get the correct path whether the pipeline is executing tasks via Windows PowerShell or PowerShell 6/7+.
Finally we execute the Cache task (currently in version 2). This task requires two inputs path and key.
-
Key: as mentioned earlier, defines the identifier for the cache that you want to restore or save. This is composed of a combination of string values, file paths or file patterns. In the above example, we provide
psmodulesas a string, followed by the Operating System version that the pipeline is executing under (derived from the Azure DevOps predefined variableAgent.OS) and finally theBuild/build.depend.psd1file, that defines our list of modules and the specific versions we want to install. The file contents are hashed, so if the file changes (i.e we change our dependency versions) then a new cache will be built.Although most of my pipelines execute on a Windows agent, I do have some cross platform modules that I test across both MacOS and Windows. By including
Agent.OSin the key, a cache is stored uniquely for each OS. For some PowerShell modules (or other kinds of dependencies you might cache) this can be important as their dependencies can be OS specific. -
path: defines the folder that you want to cache. For my pipeline this is the PowerShell Module path where modules are installed by default, that we derived in the preceding task.
You may have noticed a third input on the task above:
- restoreKeys: this input is optional. It is used as a fallback when the value specified in
keydoesn’t yield a cache hit. A restore key searches for a key by prefix and returns the most recently created cache entry. For my task, we use restoreKeys to return a cache hit even when theBuild/build.depend.psd1file has been modified. This ensures that we still download the modules from the cache even if we’ve changed one or more versions in the dependencies file. If some of the module versions remain the same, then the cache is still useful. For any module where we’ve changed the version we want to install, PowerShell will note that the exact version we require is not present and install it.
When executing the pipeline with the new task, an initial run is similar to before:
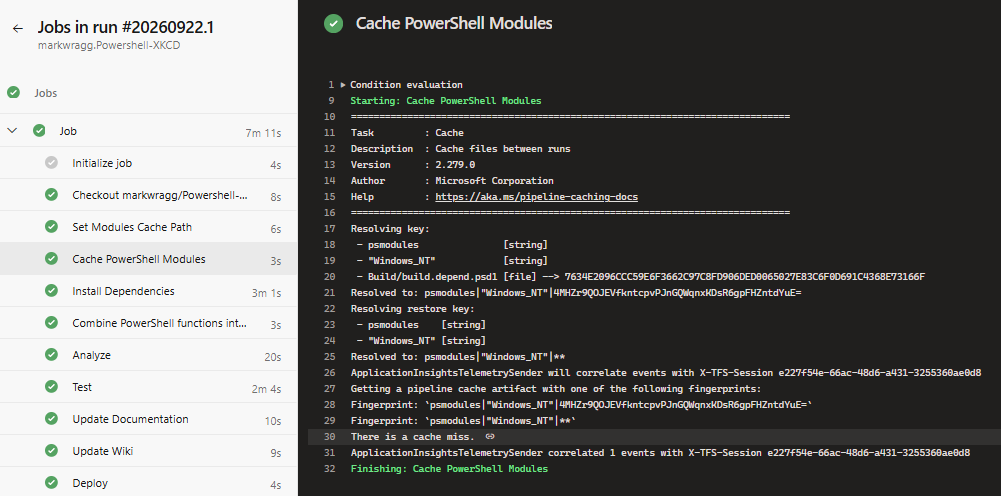
The Cache PowerShell Modules task runs, records a cache miss ❌ and terminates quickly (it takes 3 seconds). The Install Dependencies task runs as it did previously, taking about 3 minutes to download the required modules.
A post-job task executes and uploads the PowerShell modules to the cache. This takes just 8 seconds, and executes after everything else in the pipeline has completed anyway:
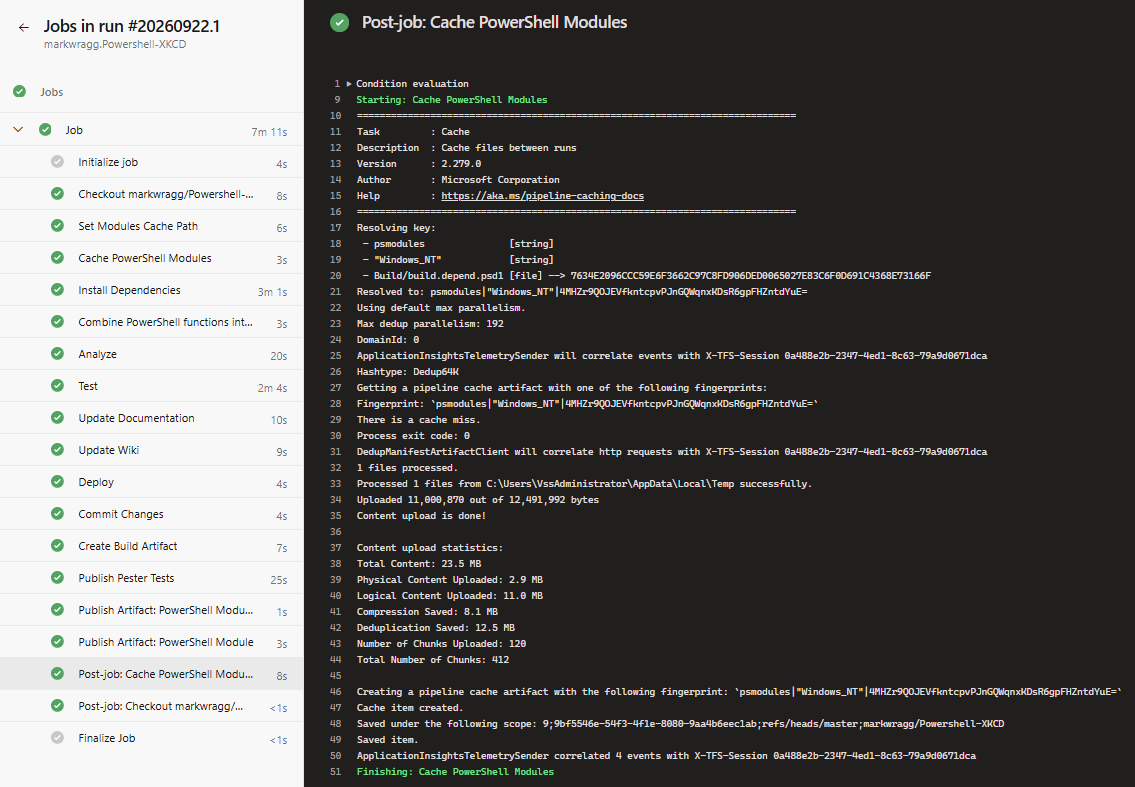
A subsequent pipeline run executed any time in the next 7 days now executes much more quickly:
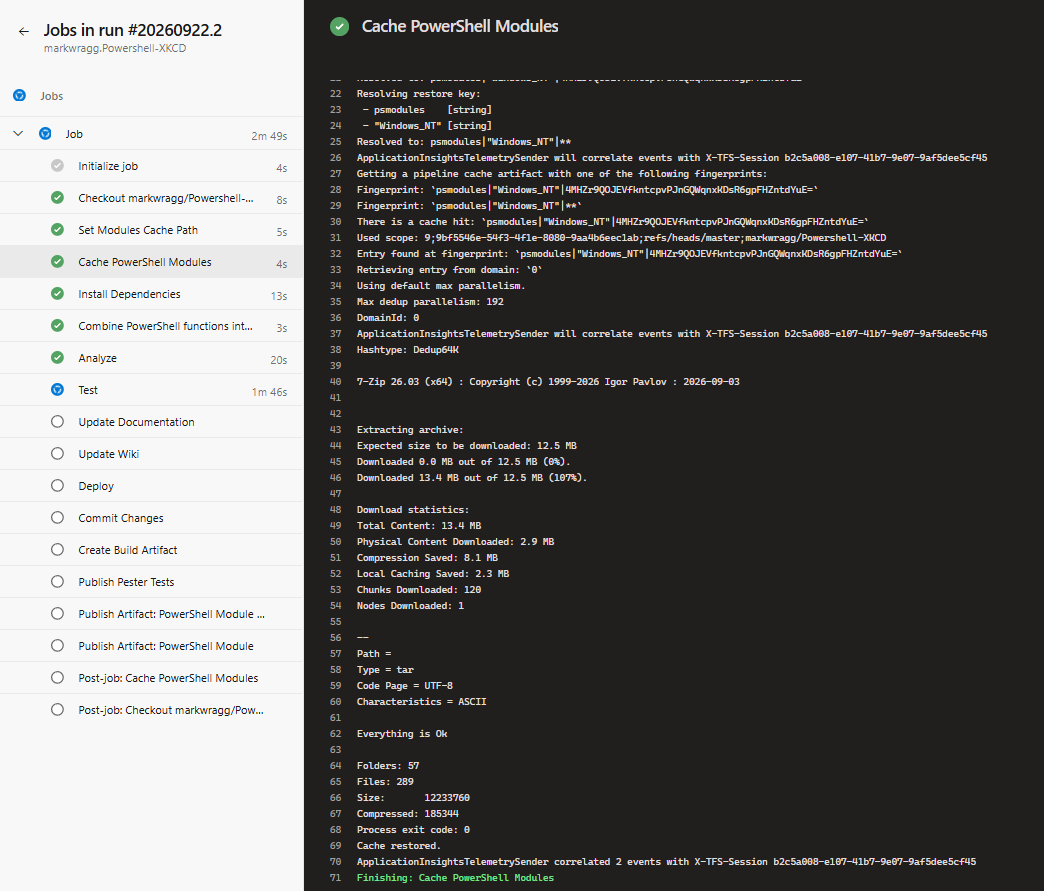
The Cache PowerShell Modules task records a cache hit ✅, and downloads the PowerShell modules back to their original path in just 4 seconds.
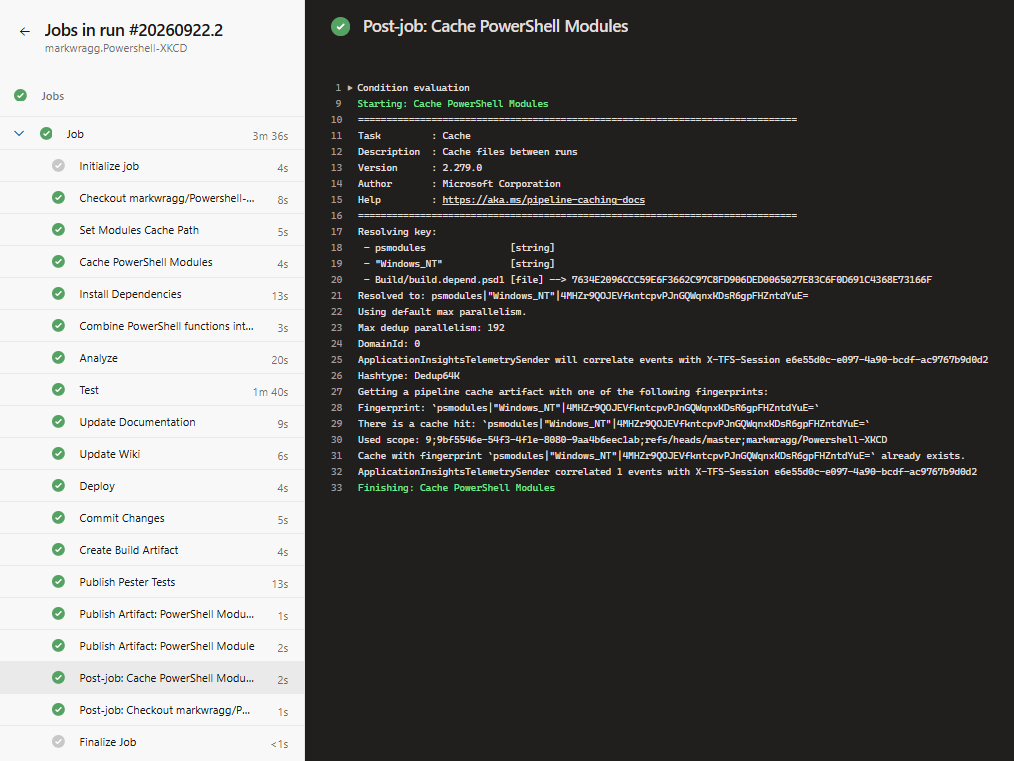
The post-job task once again executes, but terminates quickly as the cache is already present:
Conclusion
The Azure DevOps Cache task is a useful feature for improving pipeline speeds, particularly when handling dependencies, and for pipelines that may be run frequently within a 7 day window. There’s no cost or limitation to using it, and its available for Free tier users of Azure DevOps.




Comments