
This is a guide for anyone new to the Pester testing framework module for Powershell who would like to learn how Pester works in order to maintain or create Pester test scripts that are used for operational testing.
What is Pester?
Pester is an open source testing framework for Powershell.
Pester provides a framework for running unit tests to execute and validate PowerShell commands from within PowerShell. Pester consists of a simple set of functions that expose a testing domain-specific language (DSL) for isolating, running, evaluating and reporting the results of PowerShell commands.
– https://github.com/pester/Pester
Why use Pester for operational testing?
While the purpose of Pester is primarily to perform unit testing, I’ve leveraged Pester largely for the alternative purpose of operational and infrastructure testing. Pester is ideal for this purpose because:
- It’s Powershell at its core, so you can leverage the full functionality of Powershell to perform your testing
- It creates a consistent framework with which to write and perform tests
- It gives a clean output of the test result
- It can (optionally) be included in a CI pipeline, where as part of a larger automation chain Pester is kicked off (e.g after you check in a change to source control) and the result of the tests kick off subsequent activity (such as clean up of test infrastructure, notifications of the result or pushing the changes in to Production if the tests passed)
Installing Pester
If you are running Windows 10 or Windows Server 2016 you already have it installed (congratulations!). You can doublecheck you have it by executing
get-command invoke-pester

CommandType     Name                                               Version    Source
-----------     ----                                               -------    ------Function        Invoke-Pester                                      3.3.5      Pester
If not, you simply need to download and load the module as follows:
- Go here https://github.com/pester/Pester
- Click “Clone or download” > Download Zip
- Open the zip and extract it somewhere (your module directory might be ideal: C:\Users\{you}\Documents\WindowsPowerShell\Modules)
- Execute
import-module Pester
Writing a Pester test
To create a Pester test, do the following:
- Open the Powershell ISE (or another Powershell editor of your choice).
- Save a new file as myfirst.tests.ps1 (anything named .tests.ps1 will be picked up and executed by Pester by default, so using this naming convention makes your tests easier to execute)
Tests are composed of the following constructs:
- First you need a “Describe” block – This just gives the test or set of tests a name that is output when the tests run to help the user understand what kind of test/s are being performed.
- You can optionally include a “Context” block – This is another way to group up a set of tests to help give the user context.
- Write your test with “It” and “Should” – This is where the magic happens, combining these two commands tells Pester what you expected (the It), what Powershell should perform to validate that assertion and then what you expect the result to be (the Should). You do this by piping between these three components.
Here’s a simple example to get you started:
Describe  'Process checks' {

    Context 'Checking essential Windows processes are running' {

        It 'winlogon.exe is running' {
            get-process -Name 'winlogon' | Should be $true
        }

    }
}
Here’s the result when that is run:

In the output above you can see:
- The describe block we defined
- The context block we defined
- The winlogon.exe test (with the text output we defined), which is green and has a + symbol because it passed. The 649ms part is how long the test took to run.
Here’s our example but now including a failing test (true could never be false unless it was opposite day):
Describe  'My example checks' {

    Context 'Checking essential Windows processes are running' {

        It 'winlogon.exe is running' {
            get-process -Name 'winlogon' | Should be $true
        }
        It 'It should be opposite day' {
            $true | Should be $false
        }

    }
}
Here’s the result:

- The opposite day test is red because it failed and the test has a - symbol. Again it shows the time it took for test to run, then after the test it includes error output to indicate exactly why it failed (it expected a result of “false” but we sent it “true”).
Other assertions using “Should” So far in the examples above we’ve performed a simple $true or $false check using “Should Be”. We could also have reversed our logic and stated “Should Not Be” and sometimes it is a good idea to test for both positive and negative scenarios. You can also do other evaluations with Should including:
- Should Be
- Should BeExactly
- Should BeGreaterThan
- Should BeLessThan
- Should BeLike
- Should BeOfType
- Should Exist
- Should Contain
- Should ContainExactly
- Should Match
- Should MatchExactly
- Should Throw
- Should BeNullOrEmpty
For a full description of how each of these works, see the official documentation: https://github.com/pester/Pester/wiki/Should
Here’s an example of using “Exist” and “Not Exist” to check two paths. The “Exist” statement performs a test-path, so while we’re piping a string here, the “Exist” test takes that string and uses it with test-path to validate if it returns an object.
Describe 'Operating System check' {

    It 'C:\Windows folder exists' {
       'C:\Windows' | Should Exist
    }

    It 'C:\Linux folder does not exist' {
       'C:\Linux' | Should Not Exist
    }

}
Here’s the result:

Creating dynamic tests by incorporating other Powershell syntax
Pester scripts are still just Powershell scripts at the end of the day. That means that you can incorporate Powershell anywhere during the script. You might for example have a block of Powershell at the beginning of the script which gathers local settings and configuration that is then used as part of the test evaluations.
But you can also use Powershell syntax such as loops and if blocks (etc.) to make your tests more dynamic.
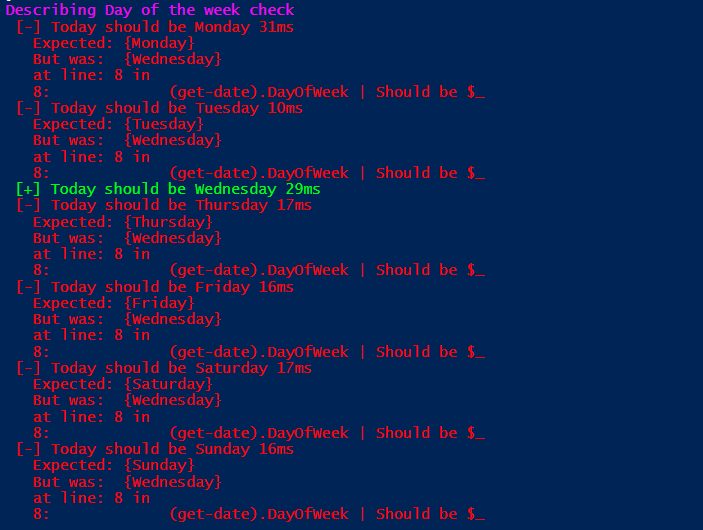
Here’s an example to test whether today is each day of the week. We could do this by writing seven individual “It” blocks for each weekday, or instead we could use an array and a ForEach-Object loop like this:
Describe  'Day of the week check' {

    $WeekDays = "Monday","Tuesday","Wednesday","Thursday","Friday","Saturday","Sunday"

    $WeekDays | ForEach-Object {

        It "Today should be $_" {
            (get-date).DayOfWeek | Should be $_
        }
    }
}
Here’s the result:
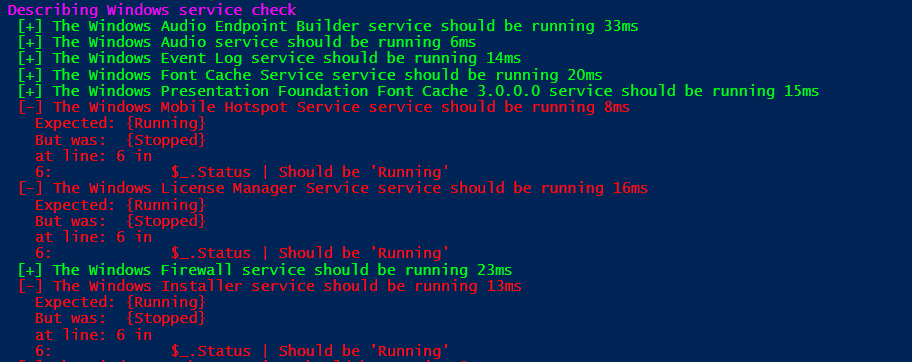
Here’s a similar example which gets every service that is named “Windows” and validates if it is in a Running state:
Describe  'Windows service check' {

    Get-Service -DisplayName "Windows*" | ForEach-Object {

        It "The $($_.DisplayName) service should be running" {
            $_.Status | Should be 'Running'
        }
    }
}
Here’s the result:
Running Pester tests
Per my examples above, Pester scripts can just be run by executing the Powershell scripts in the same way as you would any other.
Alternatively (and preferably) you can use invoke-pester.
Running Invoke-Pester will run any tests named *.tests.ps1 in the current directory (and possibly sub-directories). The tests will run and print their results to the console as above, but you will also get this summary at the end with counts of the test results:

Invoke-Pester has several parameters that are best described in the official documentation here: https://github.com/pester/Pester/wiki/Invoke-Pester
One way in which you might use Invoke-Pester as part of a pipeline would be to use the -PassThru parameter to capture the results as an object.
Here’s an example that runs Pester and returns the results in to $Results:
$Results = Invoke-Pester -PassThru
That object has the following properties:
$Results | Get-Member

  TypeName: Selected.System.Management.Automation.PSCustomObject

Name             MemberType   Definition
----             ----------   ----------
Equals           Method       bool Equals(System.Object obj)
GetHashCode      Method       int GetHashCode()
GetType          Method       type GetType()
ToString         Method       string ToString()
ExcludeTagFilter NoteProperty string[] ExcludeTagFilter=System.String[]
FailedCount      NoteProperty int FailedCount=26
PassedCount      NoteProperty int PassedCount=16
PendingCount     NoteProperty int PendingCount=0
SkippedCount     NoteProperty int SkippedCount=0
TagFilter        NoteProperty string[] TagFilter=System.String[]
TestNameFilter   NoteProperty object TestNameFilter=null
TestResult       NoteProperty Object[] TestResult=System.Object[]
Time             NoteProperty timespan Time=00:00:00.8949340
TotalCount       NoteProperty int TotalCount=42
Which I could use to drive further actions, for example If ($Results.FailedCount -gt 0) { Do some thing }.
Further reading
The official documentation is likely your best reference for further reading: https://github.com/pester/Pester/wiki/Pester


Comments